Installing an air conditioner on casement windows may prove a challenge, mainly as they do not do much when the air is hot or still. It becomes even more challenging if you have a portable air conditioner, as most portable air conditioners come with a standard window kit. So can portable air conditioners be used with casement windows?
It is possible to use portable air conditioners with casement windows. Some people use an insert that fits into the basement window to allow efficient air ventilation from the air conditioner. There are friendly and straightforward solutions that you can also try to reduce the heat with crank-out or casement windows.
Let’s check out some of them below while exploring other things to consider when installing an air conditioner for casement windows.
Do They Make Air Conditioners for Casement Windows?
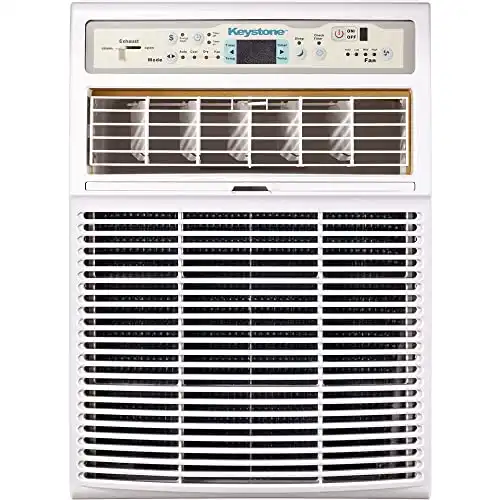
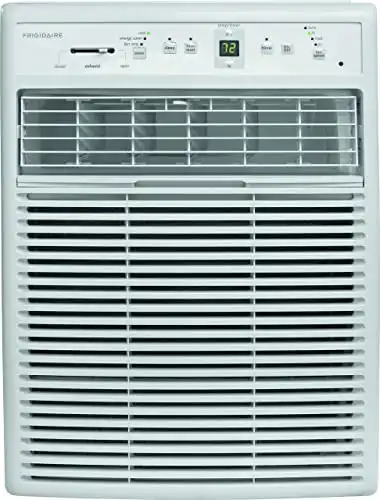
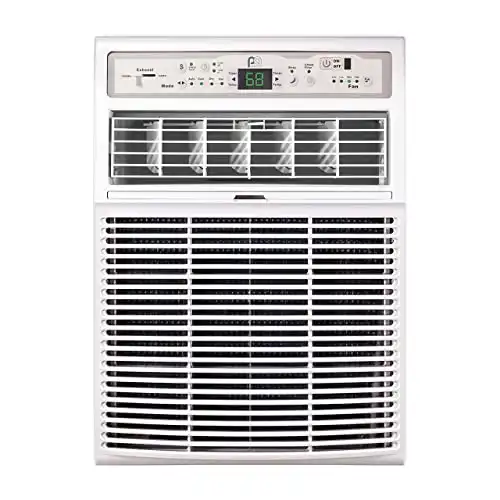
There are a few brands that make casement window air conditioners. Some of these manufacturers are;
- Frigidaire
- Koldfront
- Arctic King
- Keystone
- PerfectAire
Many homeowners with casement windows find it challenging to adopt a portable air conditioner. Casement windows crank either upwards or sidewards. The majority of homeowners opt for narrow air conditioner units.
If you have a crank window, an available option is a slider window air conditioner designed for vertical openings. Another term for a crank window is a sliding window air conditioner.
There are various considerations that you need to look at before choosing the unit to use. Chances are, you will need to find an air conditioner that can fit into your casement window for homeowners with narrow or sliding windows.
Various terminologies refer to these types of narrow air conditioner units. Below are the most common languages that it uses;
- Casement window ACs: Refers to portable air conditioners designed for a casement window.
- Vertical window ACs: Refers to air conditioner units that can fit vertical windows.
- Sliding windows ACs: Describes ACs that can fit a sliding window. It is possible to install a portable air conditioner to a sliding window with the help of the kit that covers window gaps.
- Thin ACs: These are air conditioners that have a high height and width ratio.
What Kind of Air Conditioner Do I Need for a Casement Window?
You will need a higher BTU value conditioner, particularly close to 10,000 BTU. The air conditioner should also be energy efficient with an EER value of 10 and above. It should also produce minimal noise of less than 60dB.
Now that you understand terminologies associated with casement window air conditioners, you can order with any of the listed manufacturers to get your desired casement window air conditioner.
You may wish to consider other vital factors before choosing a casement window air conditioner. Below is a description of five key considerations to look at:
1. Cooling Capacity (Units in BTU/hr)
A slider window air conditioner can deliver a cooling effect in the room. The units for measurement are in British Thermal Units. Casement window ACs can produce between 5500 BTU to up to 18000 BTU.
You will likely find casement window air conditioners that provide 7000 BTU to approximately 10,000 BTU. Thus these measurements serve as the standard capacity used as a benchmark in choosing your portable AC unit.
2. Coverage Area
A recommended coverage area is that the cooling effect needs for one sq ft to be 20. Therefore, if you require a casement window air conditioner that cools a 500 sq ft area, the slider should produce 10,000 BTU (500*20 = 10,000).
3. Energy Efficiency Rating (EER)
It is essential to go for a casement window air conditioner that is energy-efficient. Having an energy-efficient AC unit allows you to cut down on electricity consumption.
Energy efficiency is measured by EER rating. You’ll calculate this rating by dividing the cooling effect produced by the maximum input (energy).
The higher the EER rating, the more energy-efficient the casement window air conditioner is. An EER rating of 10 and above is efficient, meaning that the portable air conditioner will consume less electricity, reducing your financial costs.
4. Window Width & Height
The standard window or slider air conditioners require a minimal window width of about 20 to 25 inches. This is why slider window air conditioners have a width below 15 inches. The height may not be a common issue as the windows are vertical.
5. Level of Noise Produced
The slider window AC can be a bit louder than other conventional units. You can check the noise levels before choosing the casement window AC.
Measurements below 60 dB are considered quiet. A standard casement window AC will produce 2dB noise from the inner side, and some noise generates from the outside.
One of the highly-rated air conditioners designed for casement windows is the Koldfront manufactured model. There is much to like about this specific casement air conditioner. First, it produces a BTU of 10,000, unlike other air conditioners that deliver approximately 8000 BTU.
The air conditioner is also energy efficient. It has a rating of above ten, so it consumes little electricity. It also has other additional features that you may find intriguing such as multiple fan speeds and sleep mode, which contribute to your comfort.
The list below indicates other highly rated and effective air conditioners you can use for casement windows.
How Do You Install an Air Conditioner in a Casement Window?
Always install the air conditioner from inside the house or office. Also, make sure that the AC has a support system or an assembly. Safety is a significant consideration while putting the AC in the crank window.
Equipment & Materials You’ll Need
The following are the equipment and materials you will need to put an air conditioner in a casement window.
1. Equipments / Tools
- Screwdriver
- Square or drywall T-square
- Pencil
- Measuring tape
- Ladder
- Cutting tool (if needed)
- Cables
- Hose
- Clips
- Clamps
- Ducts
- Screws
2. Materials
- Casement window A/C unit
- Plexiglass with accurate thickness
Installation Process
Now that we know what materials and tools you’ll need, let us get down to the basic steps of putting an air conditioner in a casement window.
Step 1: Install the Unit from Inside the House
The first primary step is installing the air conditioner unit from inside the house. You may need to drive a screw or two from the side of your home or office, approximately a few inches below the windowsill.
You can do this while outside the house, leaning over the window. Leaning it over the window allows you to place the hole accurately. It is essential to use a ladder safely positioned outside.
Step 2: The Unit’s Support is the Window and the Platform Assembly
The casement window air conditioner requires a support platform system. A metal brace supports the back, which typically identifies as a platform assembly that you can install on the side of the house.
The unit requires a redundant support system that can be created on your own. You can support the front bit with a wood material that you can place on the windowsill. A significant clearance gives you more space to fill the open gap created.
Step 3: Fill the Created Top Gap
Once you install the air conditioner in the casement window, a sizable gap will be present, particularly at the top of the AC unit. You will need to cover this gap using materials such as acrylic sheets, plexiglass, pieces of board, or plastic.
Some materials are more recommended than other materials. Plexiglass is the perfect material to use to fill the gap created during installation.
Step 4: Safety Measures
A casement window AC is highly bulky and may weigh up to 80 pounds. Having a partner close to help you lift the unit and hold it in a secure place is essential. Also, ensure that the ladder holds firmly to avoid falling off.
How Do You Install an Air Conditioner in a Crank Window?
First, choose the window to use, gather all the equipment you will need in your window kit, take the measurements required and begin the installation process.
Below is a detailed list of steps you can read through, learn and follow to successfully install an air conditioner in a crank window.
Step 1: Choose a Window to Use
Casement windows often come in a group of either 2 or 3 and are placed in one single frame. It is essential to choose a window to use for the installation process. To do so, you can consider these considerations:
- The window that is the least convenient for you
- The window with the potential to provide your portable air conditioner a better access
- Equal distance between your portable air conditioner unit and the outlet
- Equal distance between your portable air conditioner unit and the casement window
In the case where your window has no outlets, then you may consider using an extension cord. You may also need to open the window to confirm if the opening is wide enough for the insertion.
Step 2: Unbox Your Window Kit
You must ensure that your window kit has all the materials and tools required to mount your portable air conditioner in the casement window. The main tools you will use are exhaust dose, screws, and ducts.
It is also necessary to prepare the window panels by sliding them into the frame. If there are some gaps, this should not worry as it is easy to resolve.
One effective way is by first measuring the openings needed to be closed to determine the dimensions required to complete the gaps.
Step 3: Take the Required Measurements
The next step is to take measurements of the window to determine the size of the Plexiglass that you will need to insert. You can order a piece of Plexiglass to be cut from a local hardware store.
A recommended thickness size for your Plexiglass is 4mm, which can be custom cut from your local hardware or webshop.
You may want to cut a circular hole or any design for your acrylic sheet. If you wish to order a specific shape, you can do so by making a DXF file.
It is easier to create a model in Onshape than export the design of your model as a DXF file, then upload the file to the website to place your acrylic sheet order.
It is always best to take the vent hose to your local hardware so that they can accurately fit based on the correct measurements.
Step 4: Begin the Installation Process
Once you have obtained your Plexiglas or acrylic sheet, you can begin the installation process. Open the casement window and attach the latch to the window and the frame. Using the clips and twist clamps, securely and carefully insert the window frame.
You can do this by sliding through the panel and screwing them into the window frame. It is essential to ensure that the hollow side of the hole faces the exterior part of your window.
What Material Can be Used to Fit in Casement Windows?
You can use various materials to vent your portable air conditioner. However, using Plexiglas can be more effective. There are multiple benefits of using Plexiglas. The major ones are:
- Ensures that little or no cool air can escape.
- Easier to cut the material into the size you need, thus proving convenient for the user.
- The material keeps insects out of the room and reduces the amount of energy consumed.
- Easy to install the window seal through clips that can be easily mounted on the frame.
- The acrylic sheet or Plexiglas material weighs less and is more complex and robust than standard glass.
Other materials that you can use are foam or thick cardboard.
There are chances that there will be spaces at the top during installation. The openings should not worry you. You can use Plexiglas to fill in the gaps. The material is convenient as it produces better results than foam or cardboard.
You can also use acrylic sheets as they are almost similar to Plexiglas. Plexiglas also gives your window a more pleasant and natural look than other materials.
Step 5: Attach the Cables & Hose
Attaching the cables and hose is the easiest part of the installation process. Insert the plug on one end of the hose firmly.
Then connect this end of the exhaust hose to the inside part of the window panel. You should also attach the other end to your portable air conditioner’s rear side.
It is essential to fasten the hose tightly to your portable air conditioner unit. The most effective way is by rotating the round duct tightly to your device.
Carefully and gently extend the hose to prevent bending or tearing. Also, remember to attach the cables and wires.
Step 6: Check if the Portable Unit is Working
Ensuring your product works is the last step that finalizes the process. This process is necessary to ensure no ventilation leaks or other problems arise from installation. Before checking if the unit is working, it is vital to ensure that the panel mounts correctly to the window.
You may also want to check if the plug of the portable air conditioner appropriately connects to the mains. Portable air conditioners may come in different designs. Some of the air conditioners have their power switches on the adapters.
You can now turn the power on after finishing the installation process. During the pre-cooling process, check for unusual sounds or any leaks that are evident in the hose. Also, observe if warm air comes from the portable unit or the ducts.
Successful installation of the portable air conditioner in the casement window occurs when the air travels through the hose outside the window. If this is so, then the installation was done correctly, and you can comfortably enjoy using the portable air conditioner.
Conclusion
Casement windows are unique designs that add beauty to your home or office. A significant challenge is that it is tough to come across portable ACs designed explicitly for casement windows.
There are, however, various options listed in this article to overcome this challenge. Following the instructions outlined in this article can make the installation process easy, and you can start enjoying the comfort of your air conditioner at home or the office.


