Not many things are worse than taking a hot shower and no hot water. Realizing you have no hot water because your water heater cannot work can make some panic. However, this may be easier to fix than you may think. To help, we’ve put together this guide to help troubleshoot why your tank water heater is not producing hot water.
Water heaters that produce no hot water often have a power failure, no fuel source, or a part of the water heater has failed.
Electric water heaters usually have a tripped breaker or failed heating element. Gas water heaters can have no fuel source, ignition failure to the pilot light, or burner failure.
Let’s examine why your water heater may not be heating or producing hot water and what you can do to get the hot water flowing again.
If you have a tankless water heater and run out of hot water, see Why Tankless Water Heaters Run Out of Hot Water.
If your water heater has an installed blanket, you’ll need to remove it to troubleshoot the steps below.
If you replace your water heater and there is still no hot water, it is most commonly due to the following:
- The water heater hasn’t had sufficient time to heat the water
- The power supply is off
- Several appliances are drawing hot water simultaneously
- The water heater could be too small for the intended use
Get FREE quotes from licensed Plumbers in your area today. Whether you need a new water heater, a sink repair, or a toilet fixed, We Can Help! All Plumbers are screened, licensed, and insured.
Troubleshoot Why You Have No Hot Water
Check the Power Supply
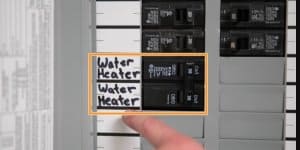
We need to check the circuit breaker inside the panel box to see if it has tripped. To do this, check your water heater breaker inside your electrical panel box to see if it’s in the neutral or middle position.
- You can move on to the next section if the breaker has not tripped.
- If the breaker is tripped, push it to the OFF position and then into the ON position.
- If the breaker immediately trips back, you likely have a faulty breaker or an electrical short somewhere in the circuit between the panel box and the water heater. If this happens, you need to immediately contact a licensed electrician to examine and repair the circuit.
- If the breaker stays ON when reset, the problem most likely lies in the water heater itself and not in the electrical circuit. Let’s move on and look at some things that could be wrong with the water heater.
- Wait 30 minutes to see if the water heater recovers and produces hot water.
Suppose your breaker has tripped and will not reset. There are three likely scenarios. Let’s look at these below:
- Burnt heating elements – When heating elements fail, they will often split. When this happens, the element will short out. This exposes the electrical components to water, which will trip your breaker and prevent it from resetting.
- The breaker or wiring – Breakers have a limited lifespan and can fail. A worn-out or weak breaker will trip when the water heater fires up and draws power. The wiring from the panel to the water heater can become loose, causing the breaker to trip.
- Your thermostat – If your water heater’s thermostat fails, it can draw more electricity than the circuit can handle. This will cause the breaker to trip.
Check the High-Temperature Limit Switch
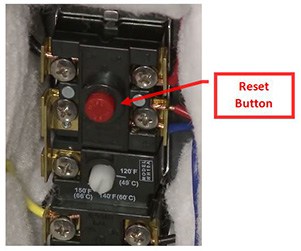
Now, check the water heater’s high-temperature limit switch (reset button). This switch is found behind the upper element access panel on the water heater’s top side. This reset will trip to shut off power to the water heater when the temperature inside the water heater exceeds 180 degrees Fahrenheit.
- Turn OFF the power to the water heater.
- Remove the upper element access panel cover.
- Pull back the insulation to expose the Thermostat.
- Above the upper heating element, you will see a large red button.
- Check to see if this button has tripped.
- Reset the button if needed.
- Turn the breaker back ON.
Insider’s Tip: If the reset button has tripped, this indicates that a problem exists. The thermostat normally cycles on and off once the tank has recovered and achieved the desired temperature. If the thermostat does not turn off and continues to heat, the reset button will trip. You should check to see if your thermostat is faulty. If you are unsure how to do this, you should immediately have your water heater serviced by a licensed plumber.
Water Heater Service Disconnect
Some water heaters have a service disconnect box at the water heater. Modern building codes require a service disconnect to be installed within the eyesight of the water heater. A service disconnect is not required if the electrical panel box is within sight of the water heater. If you have a service disconnect:
- Check to verify if the service disconnect is turned ON. This can be in the form of a pull-style disconnect or a breaker.
- For pull-style disconnects, remove the disconnect and reinsert it to be sure it’s making a snug and secure connection.
- For breaker disconnects, check to see if the breaker has tripped. If so, turn the breaker OFF and back to the ON position.
- Wait 30 minutes to see if the water heater begins working.
Check the Wire Connections
WARNING: Working with electricity is very dangerous and can kill you. Be sure the power is OFF before working with wiring and electrical connections.
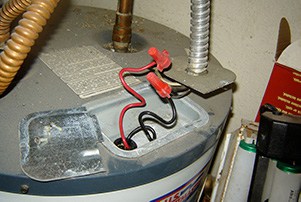
Next, we need to check the wiring connections located at the water heater. To do this, we need to:
- Turn the breaker OFF to the water heater. Use a voltage pen to check to be sure the power is off.
- Remove the junction box cover at the top of the water heater.
- Check the wire connections to be sure the wires are snug and secure.
- Check the ground wire to be sure it is snug and secure.
Check Your Thermostat & Heating Elements
Each of the heating elements in a water heater requires a thermostat. In a single-element water heater, there is only one Thermostat. Two thermostats are in more modern dual-element systems, one controlling each heating element. You’ll need a multimeter to determine if the Thermostat has failed.
The most common reason why a water heater is not producing hot water is a failed heating element. Most water heaters are a dual-element system meaning they have two heating elements; an upper element and a lower element.
The upper heating element also controls the lower heating element. If the lower heating element has failed, the upper heating element may still function; however, neither element will work if the upper heating element has failed.
If the lower heating element fails and the upper heating element is still working, the water heater will produce only half the hot water capacity. Your hot water will run out quickly or, at best, is only lukewarm.
If the upper heating element fails, the water heater will produce no hot water, regardless of whether the lower heating element is working.
Troubleshoot Why Your Gas Water Heater Is Not Working or Heating
Look at why your gas water heater is not producing hot water.
Check the Gas Supply
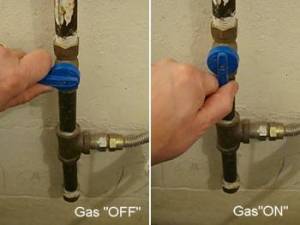
Gas water heaters are powered by natural gas (municipal supply) or propane gas (provided by an onsite tank). The first thing we need to do is check the gas supply coming into the property.
If there is natural gas in the house, check the meter to verify the gas is on. If the gas is off for non-payment of the bill, the valve will be perpendicular with a pin lock in the meter.
Check the propane tank to verify there is propane in the tank. Most tanks have a gauge on the top that indicates how much propane is in the tank. After you confirm propane gas is in the tank, check the shutoff valve to ensure it is open.
Next, a shutoff valve should be located on the gas line within the eyesight of the water heater. The shutoff valve should be in line with the supply pipe. The gas is off if the valve is perpendicular or at a 90° angle to the supply pipe. If the gas valve is off, turn the valve back inline to turn the gas on to the water heater. You’ll need to relight the pilot light. We will go over this shortly.
Check the Pilot Light
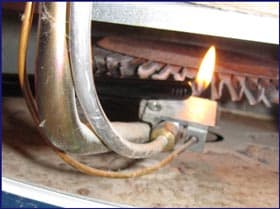
Gas water heaters are not overly difficult to work on. However, if you are unsure how to dismantle and reassemble these components, you should contact a licensed plumber for service or repair.
If the gas is on, we need to check to see if the pilot light is on. Remove the bottom cover and look through the sight glass to see if the pilot is lit.
If the pilot light is off, you should first relight it. To light the pilot:
- On the control valve, turn the knob to the Pilot position and press and hold.
- With the knob pressed, push the igniter to light the pilot light.
- Once the pilot is lit, hold the knob for up to 60 seconds to allow any air to escape and the flame to hold.
- Once the pilot is lit, turn the knob on the control valve back to the On position and adjust the temperature setting on the control valve to your desired temperature.
If the pilot does not light or stay lit, there are several items that we need to check. You need to check the following items:
- Check the thermopile or thermocouple – inspect the thermocouple to be sure it is connected tightly to the gas line. This should be positioned so that the tip is in the pilot flame. There could also be a clog in the thermocouple, or it may need replacement. Check this with a voltmeter; if the test fails, replace the thermopile assembly.
- Check the thermal switch to see if the reset has tripped. The thermal switch is located on the bottom of the water heater. Press the reset on the center of the switch, as indicated in the video. The thermal switch is an important safety device, and if the thermal switch fails, it needs replacement.
- Check the control valve – if the thermopile test passes, you’ll likely need to replace the control valve. Check the status lights on the front of the control valve assembly. Error codes 4, 5, & 7 will require replacing the control valve assembly.
Status Light Codes Normal Flashes:
- 0 Flashes Indicate Control Off/Pilot Out
- 1 Flash Indicates Normal Operation
A solid continuous light indicates that the gas control valve/thermostat is shutting down.
Diagnostic Flashes: If the water heater is not working, look for the following diagnostic flashes after lighting the pilot.
- 2 Flashes indicate Thermopile Voltage Low
- 4 Flashes indicate Overheat Failure
- 5 Flashes indicates Sensor Failure
- 7 Flashes indicate Electronic Control Failure
- 8 Flashes see “Status Light and Diagnostic Code Troubleshooting Chart.”
- There may be air in the gas line – If the pilot light goes out or the gas flow is interrupted, air will likely collect and the gas line. The air in the gas line would prohibit the pilot from lighting or staying lit. Pump the pilot knob several times to force air out of the line. While holding the pilot knob in, push the igniter to light the pilot. You may need to repeat this process several times.
- Damage gas supply line – check the gas supply piping for damage or bends, which could restrict gas flow. If a gas leak is present, there likely won’t be enough fuel to keep the pilot lit.
- Dirty burner – burners can sometimes build up soot that can prohibit the burner from functioning correctly. If the burner is dirty, it can be removed and cleaned.
- Poor ventilation – gas water heaters require proper ventilation. Check the air intakes around the bottom of the water heater to ensure they are clean and not obstructed. Vent pipes can become misaligned, blocked, or damaged. If ventilation is restricted, the water heater will not function properly. Check your vent pipes to be sure they are not blocked.
If the Water is not Hot Enough
1. Using Multiple Appliances at the Same Time
2. Check the Thermostat Settings
Check to be sure that the thermostat setting is correct. The control valve assembly on gas water heaters is outside the unit. Set the knob to a lower setting. Take a temperature reading of the hot water output and compare it against the temperature setting.
3. Inspect the Burners
As mentioned, dirty burners on gas water heaters can reduce hot water output as the flame doesn’t burn hot enough. Cleaning and servicing the water heater can get hot water flowing again.
4. Failed Lower Heating Element
We discussed this earlier in the article, but it’s worth mentioning again. In an electric water heater, If the lower heating element fails, the upper heating element will heat the water in the water heater’s top half.
The lower heating element will not heat the water in the lower half of the tank. Lukewarm water output occurs when hot water in the top mixes with colder water in the bottom of the tank.
Testing the lower element with a voltmeter for continuity lets you know if it has failed. Another way is that the hot water temperature output will run out quickly or be less than the desired thermostat setting.
5. A Leak in the Water Heater Tank
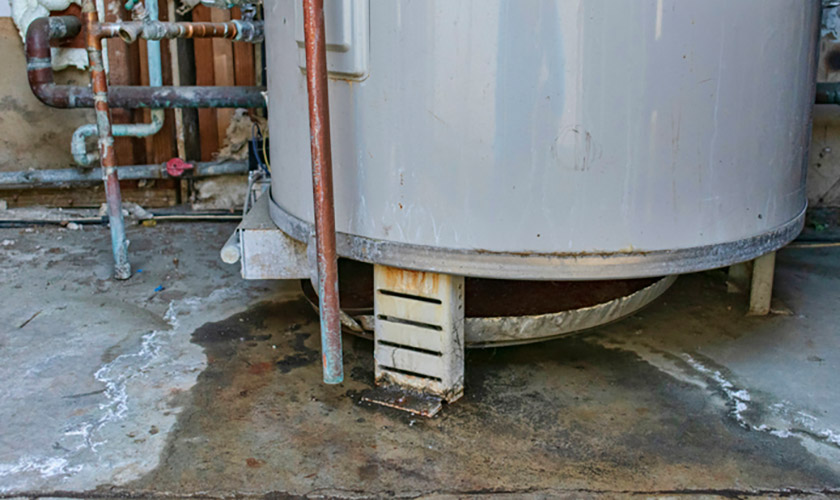
Finally, inspect the water heater for water leaks. Leaks from the bottom of the water heater result in a constant cold water supply entering the water heater. Due to the leak, the tank’s cold water cannot heat up.
Check out our article How to Repair a Leaking Water Heater – Complete Step-by-Step Guide for complete information on diagnosing and repairing a leak in your water heater.
6. Sediment Accumulation
7. Faulty Dip Tube
The dip tube supplies cold water to the bottom of the water heater for optimal performance. Some older water heaters manufactured between 1993-1996 had faulty dip tubes that would fail by breaking off inside the water heater.
If you suspect the dip tube could be bad, the only way to confirm is to remove it and see. Inspect the dip tube to see if it is intact and in good condition. If the dip tube breaks inside the water heater, you’ll need to replace the water heater because there’s no way to retrieve the broken dip tube from inside the tank.
8. Broken Thermostat
9. It’s Time to Replace that Old Water Heater
As water heaters age, parts wear out, reducing hot water output. If you find that the water heater is functioning correctly but not producing enough hot water, here are some things you can check.
Conclusion
Most repairs to water heaters are relatively easy to do. However, others can be more complex and are better left to licensed plumbers.


